결론 :
아직 기본 기능엔 멀티 상속을 지원하지 않는다. 그래서 reduce를 이용하여 특수하게 사용해야한다.
참고 링크 : https://medium.com/@thevirtuoid/extending-multiple-classes-in-javascript-2f4752574e65
Extending Multiple Classes in JavaScript
For developers coming from traditional OOP languages, I have seen them dismayed, nay, horrified that you cannot do the following in…
medium.com
장점 : 멀티 상속의 개념을 쓸 수 있다!
단점 : 부품이 되는 클래스들은 모두 다시 한번 함수로 감싸줘야 하기 때문에 살짝 헷갈릴 수도 있음.
멀티상속을 쓰지 않는 대안 :
class Parent{
	constructor(){
    	this._Part1 = new Part1(this);
        this._Part2 = new Part2(this);
    }
    test(){
    	this._Part1.test_1();
        this._Part2.test_2();
    }
}

class Part1{
	construnctor(Parent){
    this.Parent = Parent;
    }
    test_1(){...}
}

class Part2{
	construnctor(Parent){
    this.Parent = Parent;
    }
    test_2(){...}
}
멀티상속이라는 개념 자체조차 떠오르지 않던 예전의 난..이렇게 짰었다.. 근데 허다보면 알 수 있는게 this.자식놈이름.함수이름() 이런식으로 되다보니 좀 지저분해지고 시간 지나서 보면 스파게티코드의 감이 있다...
됐고 위 링크에서 잘 설명해준거 샘플 만들어보기
Main.js
|
1
2
3
4
5
6
7
8
9
10
11
12
13
14
15
16
|
import { part1, part2, part3 } from "./parts.js";
import { Base } from "./base.js";
const creator = (allParts, part) => part(allParts);
const extender = (...parts) => parts.reduce(creator, Base);
class Final extends extender(part1,part2,part3){
constructor(){
super();
this.test(); //전부 this는 Final{}
}
}//class-Final
new Final().init();
|
cs |
Base.js
|
1
2
3
4
5
6
7
8
9
10
11
12
13
14
15
16
17
18
|
export class Base{
constructor(){
this.name = "name-Base";
}
test(){console.log(this.name, 'Base',this);}
base_func(){
console.log('--------------- Base : init ------------------');
}
init(){
this.base_func();
this.test_1();
this.test_2();
this.test_3();
}
}//class-Base
|
cs |
Parts.js
|
1
2
3
4
5
6
7
8
9
10
11
12
13
14
15
16
17
18
19
20
21
22
23
24
25
26
27
28
29
30
31
32
33
34
35
36
37
38
39
40
41
|
export function part1(Base) {
class Part1 extends Base {
constructor() {
super();
this.name = "name-part1";
}
test() { super.test(); console.log(this.name, 'part1',this); }
test_1() { console.log('part1'); }
}//class-Part1;
return Part1;
}//part1
export function part2(Base) {
class Part2 extends Base {
constructor() {
super();
this.name = "name-part2";
}
test() { super.test(); console.log(this.name, 'part2',this); }
test_2() { console.log('part2'); }
}//class-Part2;
return Part2;
}//part2
export function part3(Base) {
class Part3 extends Base {
constructor() {
super();
this.name = "name-part3";
}
test() { super.test(); console.log(this.name, 'part3',this); }
test_3() { console.log('part3'); }
}//class-Part3;
return Part3;
}//part3
|
cs |
결과화면은 이렇다
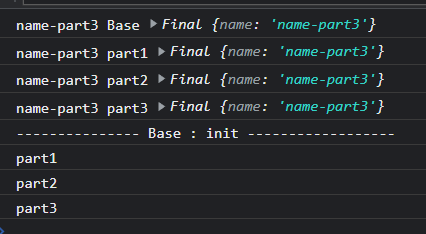
- this.name은 마지막에 extend된 자식 클래스로 덮어씌워졌다. 그래서 name-part3가 출력된다
- 중간의 Base, part1, part2, part3은 콘솔에서 걍 박아놓은거 출력중, 해당 함수를 호출하는 클래스이다.
- 마지막 Final {..}은 this이다. Final 클래스에서 따로 this.name을 설정하지 않았기 때문에 가장 마지막으로 오버라이딩된 Part3의 this.name 값을 가진다.
- Base부터 part3까지 모두 test() 안엔 super.test()로 메서드 오버라이딩을 부분적으로 하고 있기 때문에 Base ~ part2의 name-part3 가 출력되고있음. 만일 part2의 test()에서 super.test()를 하지 않는다면 part2와 part3의 name-part3만 출력하고 끝날것
실무에서 써봐야 익숙해질듯...
'CSS&JS > 👀Study and Copy' 카테고리의 다른 글
| [Hyperplexed] 인터랙티브한 마우스 커서 (0) | 2023.06.13 |
|---|---|
| [RIPT][JS][CANVAS] canvas로 드래그 가능한 사각형/원 만들기 (0) | 2023.04.17 |
| [WDS]open meteo OPEN API로 현재 지역 날씨 알려주는 웹 만들기(클론코딩) (0) | 2023.02.02 |
| [JS] vanilla JS로 Masonry Layout 구현하기(2) (0) | 2023.01.25 |
| [JS] vanilla JS로 Masonry Layout 구현하기(1) (0) | 2023.01.25 |